
Bedroom clutter has a way of multiplying when you’re not looking. Clothes pile up, shoes colonize the floor, and accessories sprawl across every horizontal surface. The fix isn’t more organizing bins, it’s smarter cabinet storage that actually uses vertical space and dead zones you didn’t know you had. Whether you’re working with a cramped 10×10 room or a master suite that still somehow lacks storage, the right bedroom cabinet setup transforms chaos into a functional system. This guide walks through practical cabinet solutions, from choosing the right type to organizing what’s inside, plus a few DIY projects that won’t require a contractor.
Table of Contents
ToggleKey Takeaways
- Bedroom cabinet storage solves clutter by utilizing vertical space efficiently, allowing a single wardrobe cabinet to triple usable storage compared to a standard dresser on the same footprint.
- Built-in cabinets maximize every inch and add permanent property value, while freestanding bedroom cabinet options offer flexibility and are ideal for renters, though they may require tip-over safety anchoring.
- Smart internal organization—including adjustable shelving, drawer dividers, pull-out baskets, and door-mounted racks—transforms empty cabinet space into a truly functional system.
- Proper cabinet placement requires measuring twice: account for windows, door swings, electrical outlets, and ceiling height to avoid blocking light, traffic flow, or storage potential.
- DIY bedroom cabinet projects like pre-fab systems, simple plywood frames, and repurposed bookshelves are achievable weekend tasks that cost $40–$250 in materials without requiring contractor labor.
- Styling cabinets with quality finishes, upgraded hardware, interior lighting, and mirrors elevates their appearance while maintaining the visual calm that enclosed storage brings to modern bedrooms.
Why Bedroom Cabinet Storage Matters for Modern Homes
Modern bedrooms do more than hold a bed. They’re home offices, walk-in closets, laundry staging areas, and sometimes makeshift gyms. That functional creep means storage needs have outpaced what a standard dresser and nightstand can handle.
Cabinet storage solves this by going vertical. While a six-drawer dresser takes up 3–4 square feet of floor space, a floor-to-ceiling cabinet uses the same footprint but triples usable storage. That’s critical in urban apartments and older homes where bedrooms average 120–150 square feet.
Cabinets also hide visual clutter better than open shelving. Bedroom psychology studies show that visible mess disrupts sleep quality and increases stress, cabinets with solid doors create a cleaner visual plane. Plus, enclosed storage protects fabrics from dust and sunlight, extending the life of seasonal clothes and bedding.
From a real estate perspective, homes with ample bedroom storage consistently appraise higher. Buyers prioritize closet and cabinet space, often ranking it above kitchen upgrades. Adding thoughtful cabinet storage isn’t just organizing, it’s a long-term value play.
Types of Bedroom Cabinets for Every Storage Need
Not all cabinets are created equal. The right type depends on what you’re storing, how much wall space you have, and whether you’re renting or own.
Wardrobe cabinets are the workhorses. These tall, enclosed units typically measure 24–36 inches deep and 60–84 inches high. Look for models with adjustable shelving and a hanging rod, many come with a split layout (hanging space on one side, shelves on the other). They work well for renters since they’re freestanding and move with you.
Armoires function like wardrobes but often include drawers at the bottom. They’re bulkier, expect 48 inches wide or more, but ideal if you’re replacing a dresser and closet combo in one piece.
Tall storage cabinets (also called pantry-style cabinets) are narrower, usually 12–18 inches deep. These fit in tight spaces like alcoves or behind doors and work great for shoes, accessories, or linens. The slimmer profile makes them less intrusive in small rooms.
Media cabinets double as bedroom storage when repurposed. The shelving meant for electronics becomes perfect for folded sweaters, bags, or hobby supplies. Look for closed-door models to maintain the clean look.
Built-In vs. Freestanding Cabinets
Built-in cabinets anchor to wall studs and often span floor to ceiling. They maximize every inch, especially in awkward nooks or sloped ceilings. Installation requires carpentry skills, you’re attaching cabinets to studs, scribing to uneven walls, and possibly adding crown molding. Budget for materials ($200–800 depending on size) plus 1–2 days of labor if you’re handy, or $1,500–4,000 for a carpenter.
Built-ins add permanent value but aren’t renter-friendly. They also require drilling into walls, which may mean patching and painting if you ever remove them.
Freestanding cabinets offer flexibility. They come assembled or as flat-pack kits (think IKEA PAX systems). Setup usually takes 2–4 hours with basic tools. You can rearrange them, take them when you move, and avoid landlord hassles. The trade-off: freestanding units often leave gaps at walls and ceilings, losing some storage potential. They also may need anchoring to wall studs with L-brackets to meet tip-over safety standards, critical in homes with kids or pets.
Clever Organization Systems Inside Your Bedroom Cabinets
Empty cabinet space is just a box, it’s the internal organization that makes it functional.
Start with adjustable shelving. Most cabinets include fixed shelves spaced 12–14 inches apart, but adjustable pegs or tracks let you customize for tall boots or short folded tees. Drill new holes on 1.5-inch centers if your cabinet doesn’t have them, using a shelf pin jig to keep them level.
Drawer inserts and dividers prevent the jumbled mess that makes you dig for socks every morning. Spring-loaded dividers adjust to fit drawer widths, while felt-lined trays protect jewelry and watches. For deep drawers, use stacking trays to create layers, it doubles capacity without losing visibility.
Pull-out baskets on drawer slides turn deep cabinets into accessible storage. Install full-extension ball-bearing slides rated for 75–100 lbs, mounted to the cabinet sides. Wire baskets work well for items you want to see (scarves, gym clothes), while solid bins hide less-photogenic stuff.
Door-mounted racks capture wasted space. Over-the-door shoe organizers hold accessories, cleaning supplies, or folded leggings. Adhesive hooks on the inside of doors work for belts, ties, and bags, just make sure doors can close fully without hitting shelves.
For space saving bedroom furniture setups, vertical dividers keep items like purses and clutches upright instead of stacked. Cut ¼-inch plywood or hardboard into panels, then slot them into dados (grooves) cut every 4–6 inches along a shelf.
Labeling matters more than it sounds. Even if you live alone, labeled bins and baskets speed up retrieval and make it easier to maintain the system. Use a label maker or chalkboard stickers for a clean look.
Choosing the Right Cabinet Size and Placement
Measure twice, buy once. Bedroom cabinet sizing goes wrong when people eyeball dimensions or forget to account for baseboards, outlets, and door swings.
Start by mapping the room. Measure wall lengths, then note the position of:
- Windows and trim: Cabinets shouldn’t block natural light or window operation. Leave 3–6 inches clearance.
- Door swing paths: A cabinet placed too close to the bedroom door creates a traffic jam. Allow at least 36 inches for walkways.
- Electrical outlets: You might need access for lamps or chargers. Don’t block outlets entirely.
Cabinet depth matters in tight spaces. Standard wardrobe cabinets run 24 inches deep, fine for hanging clothes (which need 22–24 inches), but they protrude significantly in narrow rooms. Consider 18-inch-deep cabinets if your bedroom is under 10 feet wide: you’ll lose some hanging space but gain better flow.
Height is where you capture unused vertical space. Ceiling height in most homes is 96 inches (8 feet). An 84-inch-tall cabinet leaves a 12-inch gap at the top, usable with a step stool for seasonal storage, but also a dust collector. Floor-to-ceiling cabinets eliminate that gap. If you’re building or installing, scribe the top to fit tight against the ceiling, accounting for any slope (older homes often aren’t level).
Placement strategy: Flank the bed with matching tall cabinets for symmetry, or place one large wardrobe on the wall opposite the bed to anchor the room. Avoid putting cabinets on exterior walls in cold climates, trapped moisture can condense and damage contents.
If you’re working with a full size storage bed frame, position cabinets to balance the room’s weight. A large bed with built-in storage on one wall pairs well with tall cabinets on the opposite side, creating visual equilibrium.
DIY Bedroom Cabinet Storage Projects You Can Tackle
You don’t need a carpentry degree to add functional cabinet storage. These projects range from beginner to intermediate, all doable in a weekend.
1. Install a pre-fab cabinet system
Pre-fab systems like IKEA PAX or ClosetMaid are the gateway drug to cabinet storage. Assembly requires a drill/driver, level, stud finder, and patience. Follow the instructions exactly, skipping steps or forcing parts causes alignment issues later. Budget 3–5 hours for a two-cabinet setup. Once assembled, anchor the cabinets to wall studs with the included L-brackets. This isn’t optional: tip-over accidents injure thousands annually.
2. Build a simple cabinet frame with plywood
For a custom size, build a basic cabinet box from ¾-inch plywood. Cut sides, top, bottom, and back, then assemble with wood glue and 2-inch screws. Add a face frame from 1×2 poplar to hide plywood edges. Finish with pre-hung cabinet doors from a home center (available in standard sizes) and soft-close hinges. This project suits intermediate DIYers comfortable with a circular saw or track saw. Expect $150–250 in materials for a 36-inch-wide x 72-inch-tall cabinet.
3. Repurpose a bookshelf into a cabinet
Add doors to an existing bookshelf for instant enclosed storage. Measure the opening, then order overlay cabinet doors sized ½ inch larger in each dimension. Attach with European hinges (also called cup hinges), they’re adjustable and don’t require precise mortising. Paint or stain the doors to match the bookshelf. Total cost: $40–80 for doors and hardware.
For detailed beginner-friendly furniture plans, Ana White’s site offers free step-by-step blueprints with cut lists and visual guides. Similarly, project tutorials and techniques at The Handyman’s Daughter break down joinery and finishing for new woodworkers.
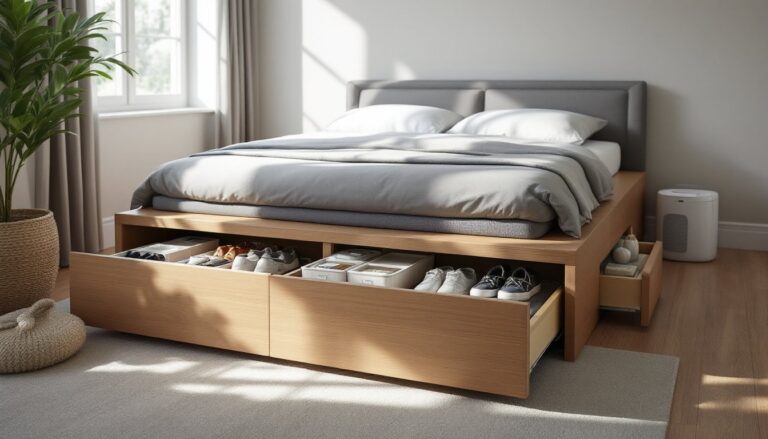
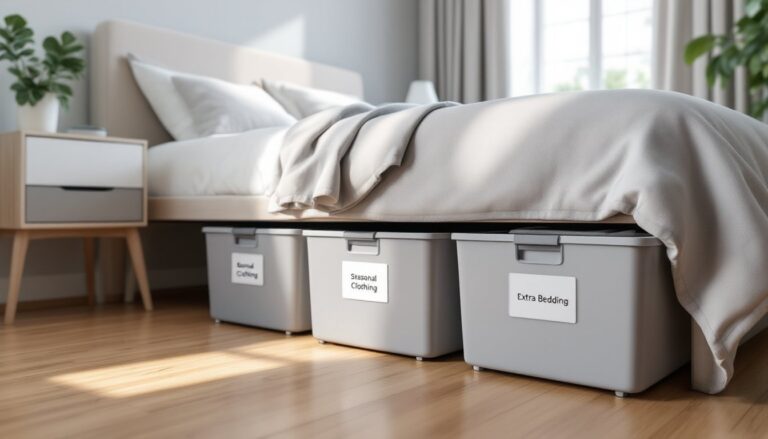
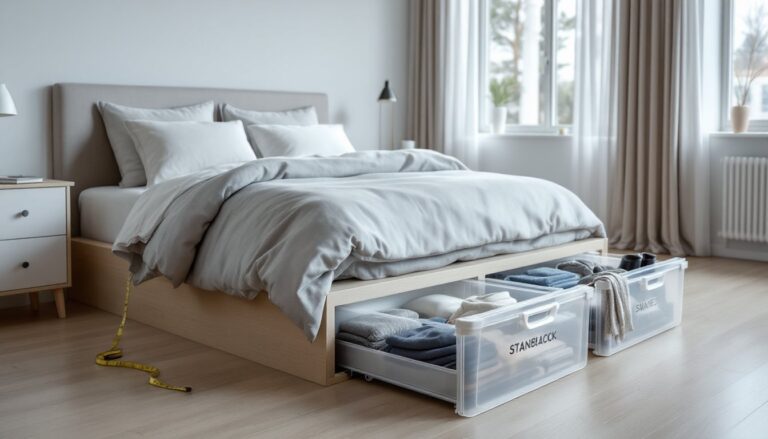
4. Build under-bed storage cabinets
If your bed frame allows clearance, build rolling storage boxes from ½-inch plywood that slide underneath. Add locking casters so they don’t roll out unintentionally. Dimension them to fit snugly: measure bed width and subtract 2 inches for clearance. These work well for shoes, out-of-season clothes, or extra bedding. DIYers have also built platform beds incorporating cabinet storage using modular components for a fully integrated setup.
Safety note: Wear safety glasses when cutting, sanding, or drilling. Use a dust mask when sanding MDF or plywood, fine dust is a respiratory irritant. If you’re new to power tools, practice cuts on scrap before cutting your actual pieces.
Styling Your Bedroom Cabinets for Function and Aesthetics
Cabinets shouldn’t look like they escaped from a garage. A few styling tweaks make them feel intentional.
Finish matters. Painted cabinets in white, gray, or soft neutrals blend with most bedroom palettes and make small rooms feel larger. For a warmer look, wood-tone finishes in oak, walnut, or maple add richness without overwhelming. If you’re painting raw wood or refinishing old cabinets, use a primer rated for adhesion (especially on laminate or glossy surfaces) and finish with satin or semi-gloss paint, easier to clean than flat.
Hardware upgrades are the fastest way to elevate cheap cabinets. Swap builder-grade knobs for matte black, brushed brass, or leather pulls. Measure the existing hole spacing (center-to-center distance) before buying replacements to avoid new drilling.
Lighting turns cabinets functional at night. Battery-powered LED puck lights or motion-activated strips mount inside with adhesive backing. Warm white (2700–3000K) is easier on the eyes than bright daylight tones. Some units include USB charging, useful if you’re running low on outlets.
Open shelving accents break up solid cabinet runs. If you have a wall of cabinets, leave one section doorless and style it with folded blankets, plants, or a small lamp. This adds visual interest and keeps the room from feeling too closed-off.
For narrow spaces, a skinny storage cabinet in a contrasting finish can add depth and character while maximizing vertical storage in tight corners.
Mirrors on cabinet doors reflect light and expand visual space, especially useful in windowless bedrooms or those with limited natural light. Frameless mirror panels cut to size at a glass shop typically cost $40–80 and attach with mirror clips or adhesive.
Finally, maintain clearance around cabinets. Leave at least 2–3 inches between the cabinet top and ceiling if you’re not going full-height, trapped dust in that gap looks sloppy. Baseboards should meet the cabinet cleanly: use caulk and paint to seal any gaps at the floor.